

Apr 12,2023
Self-adhesive vinyl is in vogue and has become a popular choice for a variety of DIY projects. It has a vast ground of applications, from adding a pop of color or aesthetics to your walls to customizing furniture and appliances similar like PVC Foam Boards. But applying and removing vinyl sheets is not so easy; it is a tricky job rather, especially if you want to avoid damaging your walls and furniture. In this blog, we will provide a step-by-step guide on how to apply and remove self-adhesive vinyl sheets, along with tips for protecting your surfaces.
Before starting to apply the vinyl, make sure that the targeted surface which you have chosen to apply the vinyl is clean and dry. In case it is not clean, use a mild cleaner and a clean cloth to remove any dust, dirt, or debris. It would be better to avoid using harsh chemicals or abrasive cleaners that possibly damage the surface.
Measure the area first where you want to apply the vinyl sheet and cut the vinyl sheet to the appropriate size and shape. Using a ruler, a measuring tape, or a template to confirm accurate measurements will be a great option. Don't forget to leave some extra material around the edges for the sake of trimming.
Start peeling off the backing paper from one corner of the vinyl sheet, exposing the adhesive side. Take extra care and avoid touching the adhesive side with your fingers, as this can leave oil and dirt on the surface and can create problems in adhesion.
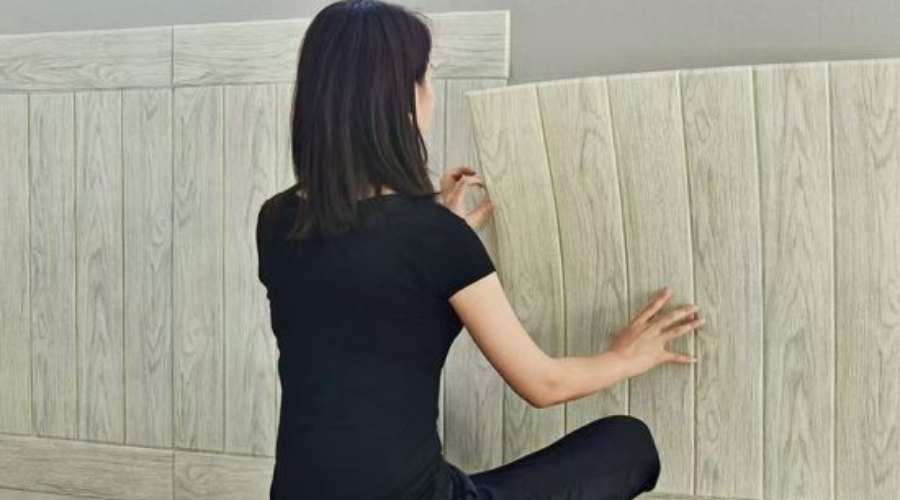
Align the vinyl sheet with the surface and gently press it down, starting from the top and working your way downward. Try to utilize a credit card or a scraper to smooth out any bubbles or wrinkles. Be sure to apply firm pressure to ensure the vinyl sheet adheres properly to the surface.
Trim the excess vinyl sheet around the edges with the help of a sharp knife or scissors. Do it slowly with care; beware not to cut into the surface or leave rough edges.
Heating the self adhesive vinyl to remove it is a great hack; use a hairdryer or a heat gun on a low setting. This will help to soften the adhesive and make it easier to remove. Be sure to keep the heat gun or hairdryer moving and avoid applying too much heat in one spot.
Once you have heated the vinyl, start peeling it off from one corner. Use a scraper or a credit card to loosen the edges. Work slowly and carefully, and pull the vinyl sheet away from the surface at a 180-degree angle.

Aftter you have removed the vinyl successfully, check if some adhesive residue is left on the surface. Use a cleaning solvent such as rubbing alcohol or adhesive remover to dissolve the residue. Apply the cleaning solvent to a clean cloth first and then rub the surface gently until the residue is gone.
Before applying vinyl, test a small, ordinary area of the surface to make sure the vinyl will adhere properly and won't damage the surface.
Vinyl sheets are prone to temperature; they expand or contract in extreme temperatures, which can cause them to peel off or bubble. Avoid applying vinyl sheets in areas that are subject to extreme temperatures, such as near radiators, cooker areas in the kitchen, or windows that are exposed to direct sunlight.
Use your credit card or a squeegee to smooth out any bubbles or wrinkles when applying the vinyl sheet. This will help ensure that the vinyl sheet adheres properly to the surface and that air will not trap.
When removing the vinyl sheet, work slowly and carefully, pulling the vinyl sheet away from the surface at a 180-degree angle. Start with a corner; this will help prevent damage to the surface.

Using a heat gun or hairdryer on a low setting will be a great idea to make the adhesive soft and make it easier to remove the vinyl sheet without damaging the surface. Be sure to keep the heat gun or hairdryer in continuous motion from one point to another, applying too much heat in one spot.
for the protection of your walls and furniture from scratches or damage, use a protective cover such as masking tape or cardboard when applying or removing vinyl sheets. This will be helpful in preventing accidental scratches or gouges.
Vinyl sheets are sensitive to moisture, which will result in peeling off or bubbling under the vinyl. It would be better to avoid applying vinyl in areas that have a higher possibility of moisture, such as bathrooms or kitchens.
If you are applying vinyl sheets to furniture or appliances, consider the finish of the surface first. High-gloss surfaces are usually not suitable for vinyl as they cause glare or reflection. Matte or satin finishes would be a better choice.
Different types of vinyl come with specific instructions for application and removal. Be sure to read the manufacturer's instructions carefully before starting your project.
